
Today’s tutorial is based on my first ever original design using the tsumami-zaiku (or tsumami kanzashi) technique. An elegant bee with just a bit of shine.
Yes, I used unconventional materials and the finished piece would look nowhere near decent in the coiffure of a geiko, but this is a design for contemporary people (see how I did that? I didn’t say ‘women’ because guys could also rock these cute bees as lapel pins).
The honeybee should be a symbol of wealth and health, as the tiny insects allow us to have food on our plates all year long.
As a gift, in my interpretation, it brings with it joy, wealth and fertility.
Since the steps are fairly easy to follow, you can make some for yourself and some for special people in your life (see how I did it again?).


Before you begin
The difficulty for this tutorial is: advanced beginner to intermediate.
This tutorial assumes you have some experience doing the different kinds of petals employed by tsumami kanzashi.
It’s not difficult, but the three layers for the body may prove to be a bit slippery.
I’ve held workshops with complete beginners who have managed to make really nice pieces (in the pictures above), so it really only requires a bit of patience.
The links to each petal tutorial are within the steps, where they are needed.
You can follow your own color scheme, have fun, try new things, we only scratched the surface here.
Tools and materials
- two squares of yellow fabric (preferably satin),
- three squares of black fabric (also satin),
- four larger squares of light golden organza fabric,
- felt and a brooch pin or hair clip,
- glue gun or fabric glue,
- scissors,
- candle and lighter (these two are optional, only if you use synthetic fabrics).


Steps
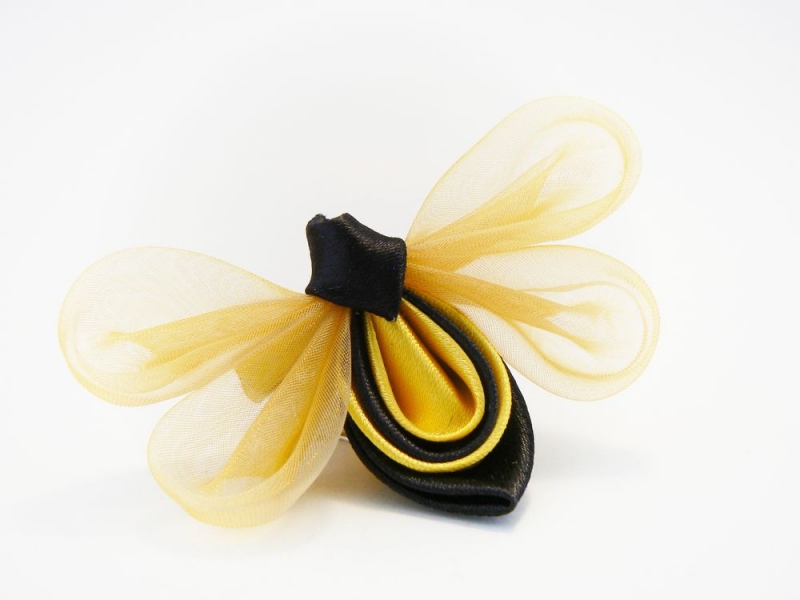
Create a “triple round petal” using two yellow squares and a black one sandwiched in between.
Fold a yellow square diagonally, then add a black folded square 2 mm below, then another yellow, also leaving 2 mm.
Fold them together to create the rounded unit.
Finish off the bottom of this unit by cutting of the excess and sealing all ends.
Note: If you want to, you can add more layers in this step. You can either use smaller squares for each stripe, or layer equal squares leaving the 2 mm space between them.
Then fold another black square to create a “pointy petal” and wrap it around the rounded unit. Glue into place in both sides.


Make the torso by creating a pointed round petal with the last of the black squares. Cut off the tip, seal the torso along this cut.


Taking one organza square at a time, create a ”rounded petal” and glue the two sides together in the back.
These will be the wings. Repeat for all four squares.


When all the parts are ready for assembly, first glue two wings to each other (only at the tip).
Glue the wing sets to the upper part of the body.


Attach the torso to the upper side ot the bee, then glue the brooch pin or hair clip to the backside, securing it with a piece of felt.


The bee is finished now and you can start wearing it!
I hope you enjoyed this tutorial and will make many beautiful bees using it. Don’t forget to share it with your crafty friends and do share photos of your finished bees on my facebook page or by tagging me on instagram.
If you have any questions or suggestions, please leave them in the comments, so everyone else who has similar questions can see the answers.
Lots of love,
Andrea