
Today I want to help you solve an important problem. Where do you get affordable and beautiful necklace displays for your handmade creations? You make them, of course. Here’s the tutorial.
You make jewelry. Sometimes very pretty necklaces. You need a way to display them, but don’t have the hundreds of *enter your currency here* to buy enough necklace stands made in some obscure factory in a far-away country. You shouldn’t have to, though.
You can make your own necklace stand really fast and with almost no expense, just like I did for my upcoming participation in a handmade fair (it was a bust, but not the kind that I’ll teach you to make today).
You don’t even need any special skills or materials, you can make as many as you like, even give them as presents to your friends who’ve run out of display space for their necklaces. They take around 5 minutes to make apiece.
Eight steps for a gorgeous DIY necklace display
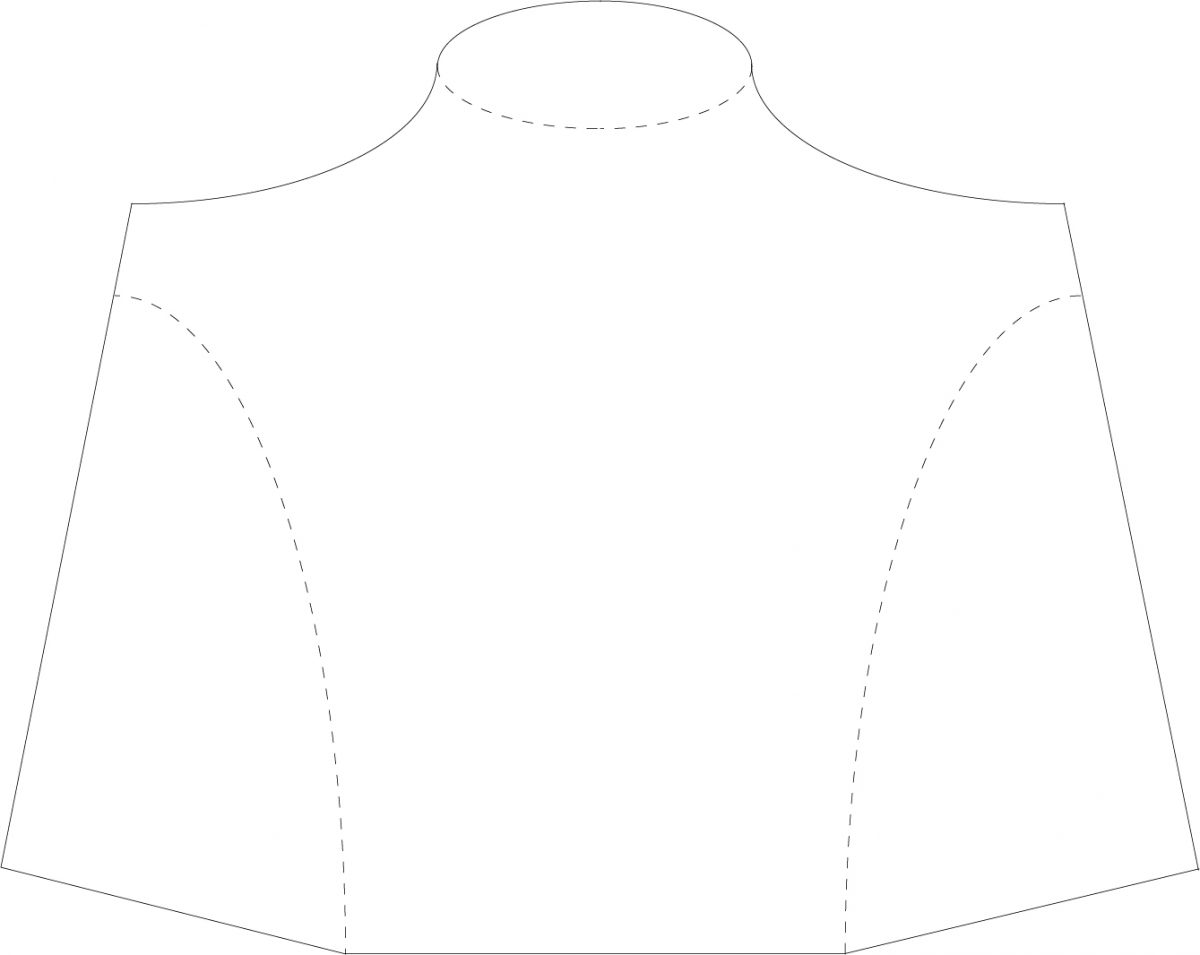
A while ago I found a “tutorial” with a tiny photo of a template, inspired by another tutorial (that is no longer available). It’s not something that I could use for my own necklace displays, so I worked on it a bit and created my own improved version.
I made it large enough so you can print it on any size paper. For me, A4 worked great (for small size necklaces), but A3 is also a good choice.
Right click and “Save image as” for full resolution
The steps for making a cardboard necklace display:
- download the photo above;
- print it on plain paper or heavy paper/card stock (160 g/m or more); if you chose to print on card stock, jump to step 5;
- cut out the template along the continuous lines;
- trace the outside of the template on the back of your chosen piece of cardboard;
- (without lifting the template) use a dull/blunt tool to trace the dotted lines – you can use anything with a point that does not cut or tear through the paper;
- cut out the template along the continuous lines;
- mark the dotted lines heavily enough that you can start to shape the display, following the rounded lines – the fold will not lay flat; continue to fold until you are happy with the shape;
- to make it more stable, depending on your chosen cardboard, punch two holes in the bottom corners and pass a thread through both holes; test the display and make a when the tension is enough to make the display stand sit properly.
Here you can find another idea for necklace display stands. And here you can fine the template for that model.
Once you make the first, the next ones will feel like a breeze.
You can recycle cardboard from all kinds of sources. I used some nice, soft cardboard from an Amazon delivery. I glued some paper on the back side to hide the print/pen marks. I also used some left-over bits of cardboard from other projects, with different effects. I’m sure you also have a stash.
The best news is that these necklace display stands are not fragile, easily replaceable and are so easy to carry. Just undo the knot in the string, take it out, flatten the display and put it in a file along with all the others.
If you want to pimp it up a bit, you can personalize it with various fabrics, the decoupage technique, give it texture with papier-mâché with strips of paper or paper pulp.
You can paint it with acrylics, apply stencils at the base or any other thing that strikes your fancy. Just remember that it’s only a display stand, not meant to be the center of attention.
Here is a cute example of a personalized necklace display from Lil.lu Bijoux
If you liked this tutorial and know someone else who could use it, please share. Your talented friends will thank you.
Also, if you want to find out when I’ll publish the next tutorial in English, sign up for the email updates to the left and check the “English articles” section. I’ll only send you important information and updates, at most once a week.
If you create a display stand with this template or if you have photos from an event where you used the display stands created with the help of this tutorial, I’d love to see them. Leave a link in the comments or on my facebook page.
Happy crafting!
Love,
Andrea