
Several years ago, prompted by a little competition on a website that supports makers, I got the idea for making a sunflower, using the tsumami kanzashi technique. It was not enough, though, so I had to add something.
A beaded piece was the natural thing to try, especially because I had a lot of black and brown beads from my previous experiments and a friend and I had no idea what to do with them.
The first iteration, like all first experiments, did not completely fail, but it wasn’t exactly what I had imagined. The nice thing about first iterations of anything is that you have something to work on, something to tweak and make better. So I did.
I changed the center of the flower from a brick-stitch to a simple beaded embroidery felt circle that I attached to the silk petals. It was a lot of work, but it finally looked like something I would love to wear. One of my loyal clients quickly snatched it up and displayed it proudly around town. I saw it several months later and it looked so good on a lapel… The next version was just a bit more ordered (I had learned to embroider a little better) and then I forgot all about sunflowers.


Luckily, I have clients that like to go way back through my galleries and I got several requests for these pretty sunflowers to be worn as wedding accessories.
The problem was that the pretty silk that I had used before was almost finished (that’s what happens when you recycle fabrics), so I had to use something else. Something sturdier and with a more intense color.
I had two rolls of yellow satin ribbon that I had never used. They were perfect. The petals were much easier to shape and, once I got the hang of the embroidery process, I could work on it really quickly.
You’ll find out soon enough, if you try this tutorial. You won’t be able to stop making sunflowers, I’m telling you.


The exact number of petals is not crucial for this design. Depending on how large you make the seed part, you will use more or fewer petals. You may decide that you want one or two layers of petals.
A safe number would be between 40-60 petals for a flower with two rows.
Keep in mind that in order for the flower to look like a sunflower and not one of its cousins, the seed part should have a diameter larger than the length of the petals. That’s why I recommend using 2.5 cm (1 inch) wide ribbon for small flowers (around 10 cm or 4″ in diameter).
This tutorial uses two different techniques, so please become familiar with them before attempting to make a sunflower. Practice bead embroidery in circles and making the petals and then put them together to make this. There are detailed tutorials for each of these techniques that I link to at the appropriate moment.
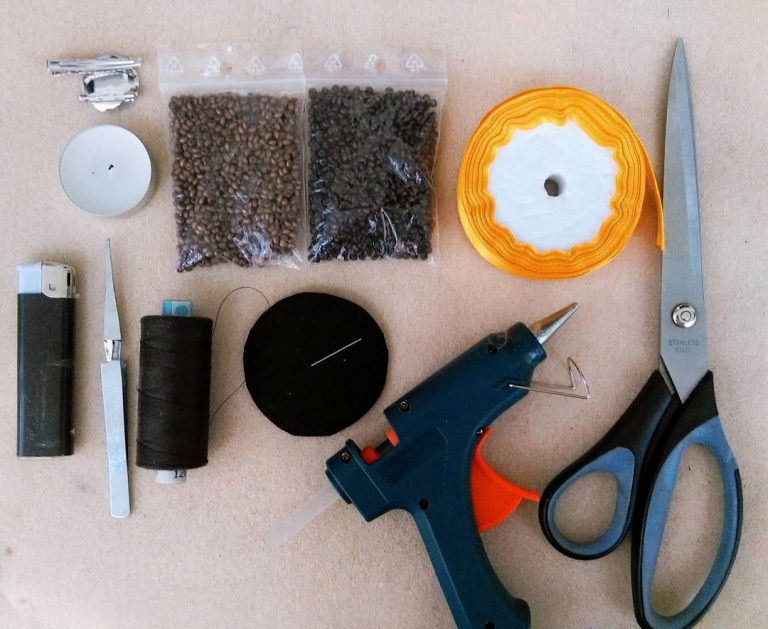
Materials and tools:
- yellow satin ribbon – 2.5 cm or 1″ wide – enough for all the petals, around 2 meters (6 feet) should be enough for one flower;
- seed beads – different colors and size – 2-4 mm in diameter and preferably with a large hole, so it’s easier to work with them; black and shades of brown, even green work well for this flower;
- felt – a black circle for sewing and another one for hiding the back of the work; a green piece for leaves – optional;
- a circle of card stock or plastic, for keeping the shape, in case you are making larger flowers;
- thread and needle for beads – pick a needle with a narrow eye that goes through most of your chosen beads;
- scissors, optionally embroidery scissors as well;
- hot glue gun or fabric glue;
- brooch pin, hair clip, comb or any other means of attaching the flower.
Pașii de lucru:
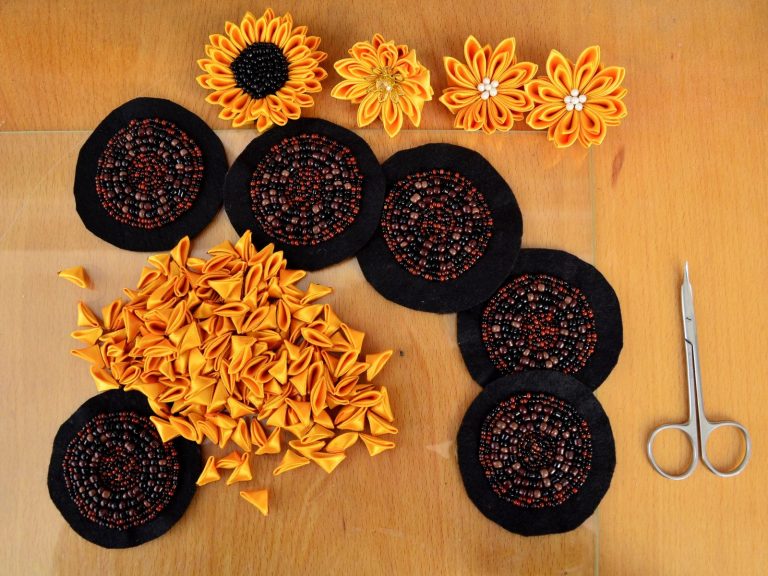
- Cut the ribbon into squares and make the pointy petals. Follow this tutorial and make some for practice if you have never made this kind of petals.
-
Embroider the center. I normally use the backstitch, taking a few beads at a time. There is a nice tutorial on this website. I might make my own version of the tutorial at some point. The steps are these:
- Thread the needle, make a knot at one end and pull it through the middle of the felt circle.
- Start with one bead, secure it in place. Make a circle around this bead, by stitching every one of the beads in place. Go through them again.
- Continue stitching in concentric circles. You pick the size of the beads for each row, but keep all the beads on one row the same size.
- A nice variation in size starts with small beads in the center, then a few rows of larger beads and two more rows of smaller beads. Try your own combination.
- After every row, secure the beads by stitching through groups of them once more.
Tip: don’t use thread that is longer than your arm. It will be much easier to work with a shorter thread and it will not break or twist mid row.
- Once you have enough beads for the center of the flower, pass the needle to and fro three times through the stitches on the back of your work. This will secure the thread and you don’t need to make a knot.
-
Start attaching the first row of petals around the beads, without covering them or leaving a space that is too wide. Try to get the tips of the petals to touch just slightly the last row of beads.
-
Optionally, glue the second layer of petals. Add one petal between two from the previous row, up to half of its length.
-
Glue or sew the pin or clip to the other felt circle.
-
Optionally, cut leaves out of the green felt. Glue them to the back of the flower. If you want to use the card stock or plastic circle, now is the time to also attach it to the back of the flower.
-
Glue the second felt circle to the back of the flower, sandwiching the leaves and hiding the stitches.
Your flower is ready!


I hope you enjoyed this tutorial and that you will show me some sunflowers that you made. You can send me pictures on my facebook page or by mentioning @andi_bede on Instagram.
If you want to try your hand at other designs as well, you will find several related tutorials below this post.
Happy crafting!
Hugs,
Andrea